Step #9: Foundation & contour
Rejoice the wonders of makeup. Here is the
base of the true transformation. When
comparing male and female faces, the underlying bone structure is what creates
the feminine versus the masculine face. With highlight and contour you can
emphasize and de-emphasize this bone structure (respectfully).


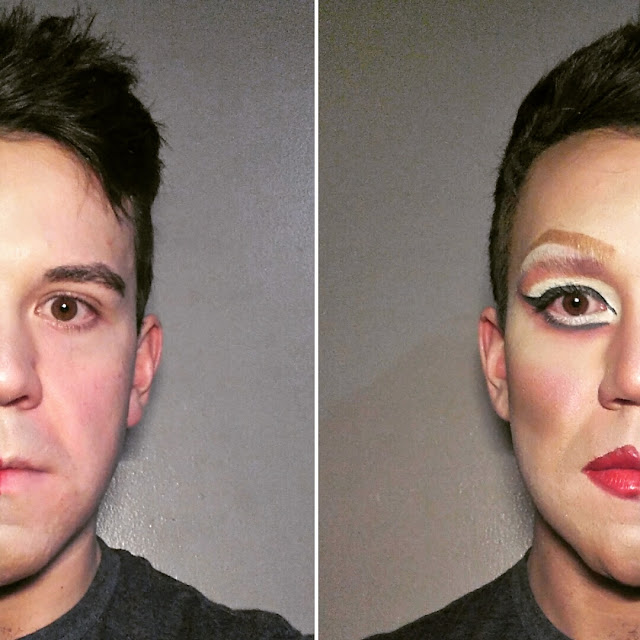
The beginning of this process is fairly standard. If you are a man with heavy dark stubble that likes to show through after only a few hours, you’ll want to start by covering your beard area with a dark foundation, similar to that used to cover the eyebrows. On the left you will see an over exaggerated colouration using dark orange foundation. The orange tinge will prevent the stubble from being visible beneath your makeup. Willam learned this the hard way. Make sure you blend out the lines so that they are less harsh.
After applying your beard cover, apply a
base coat of skin tone (or your chosen skin tone) foundation to the entirety of
your face (your eyebrows should be covered already).
Some notes on products first:
- Beauty blenders are wonderful tools for blending your foundation, your contour, and your highlight. Get it wet, completely drenched in warm water, then squeeze it out. How you use it will depend on the step.
- Foundation brushes are good for a light layer of foundation, touch ups, and colour correction.
Here are a few techniques for applying
your foundation, but they depend on the type of foundation you are using.
- Liquid foundation? Apply using a sponge, dabbing it into your skin to conceal your pores, and then blend the foundation into your skin with a beauty blender.
- Stick foundation? Apply with your stick, then either spread it into your skin with your fingers or with a beauty blender, or do one and then follow with the other. I personally apply my foundation with my fingers, then blend it out with the beauty blender for a seamless finish.
- Powder foundation? Not recommended for the base layer. You need to have a base with which to blend in your contour and highlight. Liquid and stick foundations are easily blended, powders are not.
Your end result should be what I call the Voldemort stage (right)
Face erased, you now have your blank page on which to
create the person you want to become.
Now here’s the second benefit of using a
beauty blender, if you used it on your base foundation, it has now picked up
that foundation, and will be re-applied when you blend your contour and
highlight. This will create a more
seamless transition between colours!!
Below is the highlighting and contouring
pattern suggested by the incomparable Kevyn Aucoin from his book Making Faces©.
Contouring - The purpose of contouring is to add depth to the face. Contoured
areas will recede away from the light. The direction and extremity of your
contours depends on your facial shape and underlying bone structure (right).
1. 1. Under the cheekbones:
- -If you have a shorter (heart) or square-shaped face, use a downward angle contour to create more depth to the face.
- -If you have a longer face, use a horizontal contour to shorten the face.
- -If you have a round face, use a downward arc to add distinct cheekbones

- -Use contour here to shorten the forehead, and create a more angular brow. We call this the beige rainbow. This also helps to create a shading/shadow to blend the skin tone into the hairline. Make sure you contour ALL THE WAY INTO the hairline!!!!
- -Similar to cheekbones, shorter or square faces should focus on angling the forehead by concentrating more contour close to the temples, and less on the top of the forehead.
- - Longer or rounded faces should concentrate on shortening the face by adding a larger beige rainbow, while also angling the forehead.
3. 3. The neck and jawline
- -On a heart-shaped face contour only the jawline closest to the neck to soften the jaw.
- -If you have a square shaped face, contour along the top of the jawline at the same angle as your cheek contour.
- -On a long face, apply contour to the entire jawline and chin to mimic the jaw structure while shortening the face, then contour down the neck.
- -On a rounded face the jaw and neck can be mostly ignored, as the bone structure already appears as a diamond shape one the cheekbones and forehead are contoured.
4. 4. The nose
- -Generally the nose should be contoured to be slender. Use contour to recede the sides of the nose and any bone structure that differs from a straight, slim nose.
- -If necessary contour the underside of the nose to shorten it and contour the nostrils to decrease width.
Highlighting – The purpose of highlighting is to bring certain areas of the face to the forefront.
1. 1. On the cheekbones
- -Bring out your bone structure by adding a lighter colour, or even shimmer to the high parts of your cheekbones. The best way to locale where to highlight is by taking your hand and feeling for the bones.
- -Highlight the bridge of the nose all the way up to the forehead and above the eyebrows
- -Brighten the underside of the eyes down to the outside edges of the nostrils where shadows tend to form on the face. This will add contrast to the contours you have applied to the nose and nostrils, and the colour you will eventually apply to the eyes.
- -This one is generally ignored by women's makeup tutorials, but common for drag queens. Add an additional line of highlight underneath the cheekbone contour, and above the jawline contour to increase contrast and define shape. This can extend under the bottom lip and in the crease of the chin.
Now blend it all together, especially on
the forehead, jaw and neck to remove harsh lines, and set your highlights with
translucent powder.
However, before you're done, consider the following:
However, before you're done, consider the following:
Using a liquid foundation for highlighting will change the way the light hits your face, emphasizing and de-emphasizing certain structures. If you want to change the shape of your face, it is a good idea to go over your contours again with an over-exaggerated powder contour. Use darker colours to create harsher contouring to really pronounce those changes to your facial shape. Again, blending is good if you are trying for a more natural look, although, not all drag queens go for the fishy face!!
So, now that all that technical crap is out
of the way, here is my personal take on it. Once you have figured out the directions
and dimensions that work for the face you are trying to create, stop listening
to online makeup tutorials, and do whatever the hell you want.
For example: why blend out the lines of
your contour and highlight?!?! Some of the most outrageous drag looks have the
harshest lines of all!!! Unless you’re trying to be a fishy queen (and let’s
face it, some men are just not meant to look like women), throw convention out
the door and have some fun. Leave harsh lines, use abstract or unorthodox colours, express your creativity and enjoy yourself! Drag is supposed to be self-expression, not
regulation. Queens are rulers, not followers, so take command of your face.


Comments
Post a Comment