Step #12: Finishing Touches
Eyebrows
You would think that this doesn’t belong in
the finishing touches section of a tutorial…and you would be right!!! I fucked
up, and forgot to include eyebrows in the eyes post. Oh well, better late than
never.

Yes, eyebrows truly dazzle, and they are
one of my favourite parts of my drag face because I like bitch brows. So much.
A high, sharp arch and dark, harsh lines really bring the resting bitch face
to the forefront, and when you combine it with my mountain peaks of lips, it’s
a truly bitchy sight.
The newest trend however is an ombre
eyebrow. This is where you fade your
eyebrow into your face towards the bridge of your nose, avoiding harsh lines.
You can also ombre the colour to make it darkest towards the outside of your
face, and lightest towards the fade.
In either case, start your eyebrows with a
light colour to plan out the shape, either a light eyebrow pencil, or a powder
eyeshadow. If you want a guideline for positioning of the start, end, and arch
of the eyebrow have a look at the image below. This map is excellent because
you can modify it for almost any eyebrow shape.
 After you’ve mapped out your eyebrows,
begin to fill in the shape with a darker colour more similar to either:
After you’ve mapped out your eyebrows,
begin to fill in the shape with a darker colour more similar to either:- 1. Your hair colour (for that natural look)
- 2. Your random colour selection of the day
This is where you would start your ombre if
that were what you desired. Darken the arch and the tail with either another
darker colour, or a liquid eyeshadow or eyeliner for a crisp, clear line. Then, blend out the start of your brow into
the centre of your face with a blending brush.
Don’t forget to highlight under your
eyebrow! This is like highlighting your brow bone on a natural face. It also
gives you the chance to clean up the lines of your eyebrows, and really make
them pop!
Blush
your cheeks
Most faces (not all) have a natural glow, a reddish tinge to the cheeks. When we apply
a face full of foundation, this natural glow gets covered up, so we have to reapply it. Starting at the ball of the cheek (the part that gets bigger when you smile), frugally apply blush, and bend it into your cheek contour. Then you can go back and add more if your desire. Too much can look a little clownish.
You can also add blush to other areas, like the temples, tip of the nose, and top of the chin to give a nice glowing complexion.
Glitter
your eyes or lips
This is my new favourite makeup trick. After I have applied my eyeshadows, I take
glitter glue (Ben Nye, but whatever will work) and apply it to the region I
want to glitter (usually the natural hood of my eye, now the new lid of my drag
eye). Then I take a damp, flat eyeshadow brush and press the glitter into the
glue until it sticks.
I apply glitter AFTER the eyeshadow so that
if any falls off over the course of the night a patchy surface does not remain.
Also, this allows me to experiment with multiple colours, for example blue
eyeshadow with a silver glitter to give a pearlescent blue appearance.
You can do the same thing with your lips,
either by applying the glue on top of your lip liner, or by applying after
putting on liquid lipstick.
IMPORTANT: When purchasing glitter, DO NOT buy metal or plastic based glitters!! These can damage your eyes if they fall in.
Contour
your breasts
If your look has an open chest, and you’re
trying to look like a woman, then you’d better A) have a shaved or waxed chest and B) contour on some breasts. Even the most flat chested of ladies have a
little contour to their chests, so you should too!
Start with a base of foundation just like
you would your face, and blend it out with a brush, blender, or your fingers.
Next, either use a liquid/cream contour or a powder contour to carve out the
shape of your breasts.
Blend out these lines!
Once you have that base contour, you can
start to darken the centre of the chest where the breasts meet in the middle,
and the underside (if visible), as these are the most shadowed regions of the
breast. Again, blend it out! The shading should fade from the darkest region
(the middle) to the lightest regions (the swell of the breast and the chest).
Now, highlight the swell of the breast with
a lighter colour (I use white) and blend it into the contour, and highlight the
area between the breasts. The size of the gap is up to you, and the size of
your fake boobs. DO NOT BLEND THIS LINE
into your contour, but definitely blend it up your chest. I like a nice wide
gap. I feel like it makes my B-cups look perky and perfect.
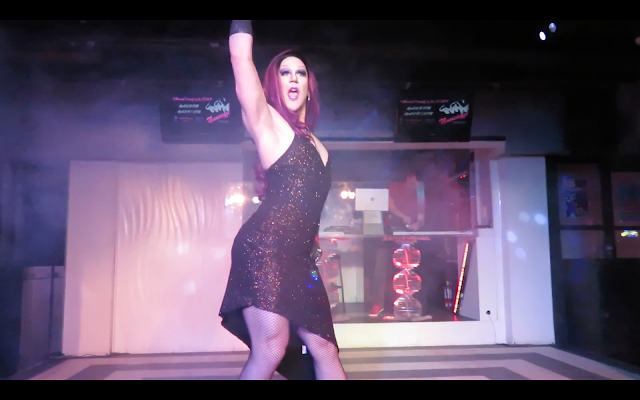
The picture you see below is a prime
example of all of these finishing touches combined as one:
- - The eyebrows are high, arched, and even slightly ombre (darkest at the outside, lightest at the centre)
- - The breasts are contoured, and gratuitous
- - The eyes are glittered all through the newly created lid of my eye with pink craft glitter
- - The cheeks are blushed and the blush is blended into the contour. I also applied blush to my temples.

The only issue is that these photos were
taken before I put on my jewels. Very sad.
Well there you go! I hope this tutorial has
given you some useful advice to help you along your way. Good luck on your
journey! Follow me on instagram (itritoresist or search Rowena Whey) and send
me some faces! I’m always looking for inspiration.
All
the best, now and forever,
Rowena
Whey

Comments
Post a Comment